Philco Model 41-221 Radio (1941)


My Dad owns this charming little wooden tabletop, which
I first saw when visiting my parents in Minnesota during
Summer, 1998. I brought it home to Washington and restored it, then
shipped it back to him. It now sits on the desk in his study.
Description
This radio was made in 1941, one year before domestic US radio
production was halted for World War II. Featuring shortwave as well
as the standard AM band, it probably played a number of historic
broadcasts during the troubled wartime years.
Employing seven tubes, it is a fine performer, with great sensitivity on
the shortwave bands.
Philco made a number of radios with this same general profile.
My 1947 Philco 47-240 is about
the same size and shape, but its grille is white instead
of marbled brown, and its squared-off cabinet is covered with leatherette.
If you flip through
collector books, you will see other Philcos with similar grilles
and dials.
Although this set uses only AC power, the handle on
top implies portability. Handles were fairly common on 1940s
tabletops. I doubt that anyone carried these radios from room to room all
day long, but a compact tabletop like this was certainly easier to move
on occasion than the massive consoles, tombstones, and
cathedral sets of previous decades. Only after World War II,
with the introduction of miniature glass tubes, did true
"carry-along" portables become practical. You can see a bunch of
them in our Tube Portables section.
When my Dad found this radio, its finish was damaged on top of the cabinet.
The contrasting handle and feet had the usual scuffing, and the
clear dial cover was split completely in two. The electronics
were complete, but needed restoration. The plastic grille and
bullet-shaped knobs were in fine shape, requiring only some polish.
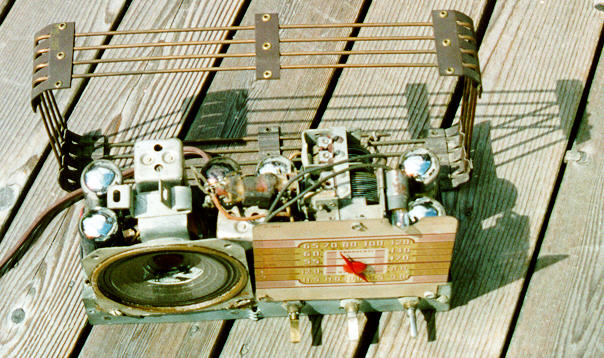
The first step in any restoration is to remove the chassis from
the cabinet and clean everything up. The photo below shows the chassis
before any cleaning or restoration had been done (click the
thumbnail to see the full-size picture).
Visible in this photo is the onboard antenna, a cage-like structure made
of about four and a half turns of very thick wire, held
apart by cardboard spacers.
My Philco 42-350, made in 1942, has
a similar antenna. You can also attach a long-wire external
antenna for better shortwave reception.
The speaker is bolted onto the chassis, an
arrangement that simplifies servicing. You may get
somewhat better sound when the speaker is bolted
directly on the cabinet, but that arrangement can
lead to broken speaker wires if the serviceman is
careless in removing the chassis.
Cabinet Restoration
Restoring this cabinet took a few hours, but it presented
no unusual challenges. Although the finish was
damaged on top, the front—including the original Philco
decal—was in excellent shape. I decided to refinish
the top and sides but leave the front alone.
Before attacking the wood finish, I cleaned and polished
the plastic grille. The letters BDCST and SW (indicating "broadcast"
and "shortwave" bands) are lightly molded into the grille
above the center bandswitch knob. I took care not to rub away the
gold paint in these letters.
Not much could be done with the split dial cover, which was
made of fragile plastic (possibly even celluloid). Perhaps someone
knows how to make a seamless repair in that sort of thing, but
that task goes beyond my skills! Fortunately,
I had a junker Philco with a good dial cover just like this one.
After removing the old broken cover, I attached
the new one using a few dabs of hot glue inside the cabinet.
Now, for the cabinet!
The handle is attached with two screws through the cabinet top.
I removed the handle and set it aside.
Then I cleaned the whole cabinet with paint thinner and
a soft rag.
I stripped the top and sides with Citri-Strip stripper,
an orange gel that's easy to control and doesn't work too quickly.
To preserve as much original character as possible, I did a
light stripping job, removing only as much finish as needed
to make the finish consistent. Citri-Strip is removed with
paint thinner and soft rags. After the stripping was done,
I let the cabinet dry thoroughly.
The stripping lightened the original color, but didn't remove all of it.
This made it easier to match the stripped areas to the untouched front.
I restained the stripped area with a medium walnut stain, taking care to match
the original color of the front. After the first stain coat
dried, I applied an extremely thin second coat to the entire cabinet,
ensuring perfect color consistency all around. I let each stain
coat dry overnight.
The next step was to re-lacquer the very dark handle and cabinet feet.
Since the handle had been removed, I simply set it on a newspaper and
sprayed on some brown toning lacquer.
The feet are glued to the cabinet, so before spraying them,
I carefully masked the rest of the cabinet, using
masking tape and multiple layers of newspaper.
That took care of the contrasting detail pieces.
Only one more step to go! The entire cabinet could use a coat
of clear lacquer. I removed the old masking from the cabinet,
then applied new masking to cover the grille and dial.
After sprayed the cabinet and handle, I let things dry for
a few minutes (lacquer dries quickly) and reattached the
handle. To avoid a "too new" appearance, I buffed the whole
cabinet very lightly with super-fine steel wool.
Electronic Restoration
Like most old radios, this one had undergone some repairs in
the past. I could see a couple of replaced capacitors under
the chassis, and someone had crudely tried to patch a small split
in the speaker using white medical adhesive tape. Over the
years, the tape adhesive had dried, becoming completely brittle.
When I removed the chassis from the cabinet, the pieces of
old tape simply fell off.
In the chassis view,
you can see the white adhesive remaining on the speaker cone.
Before testing the radio, I used DeOxit cleaner to clean the
volume control, tuning capacitor, and bandswitch. I also
removed and tested each tube in turn. Each tube tested
fine, which is fairly common in my experience.
The next step was to plug the radio in to my variac
and turn it on, then gradually increase the supply voltage.
This gives
you an opportunity to watch for other problems in a
controlled setting. When it reached full power, the radio
played weakly, a sign that it had no serious problems.
Then I "recapped" the radio, a routine procedure you
can read about in Replacing
Capacitors in Old Radios.
At that stage, the radio played
well except for some buzzing in the speaker.
Restoring the speaker was not hard. The old adhesive was so
dry that it easily came off with some careful scraping.
Then I fixed the tiny split in the cone with ordinary
fabric glue. For larger splits, you can reinforce the repair
with a piece of teabag paper.
Since the buzzing came from inside the speaker, the cause wasn't
immediately obvious. However, I could temporarily eliminate
the buzz by nudging one side of the cone with
a fingertip. Perhaps the cone had simply been warped
by the tape adhesive as it dried and shrank over the years.
Or, possibly some specks of dirt had worked their way into
the speaker's innards.
I blew compressed air all around the speaker cone, in hopes
of dislodging any trapped dirt, then simply let the radio
play for a few hours. If the cone had indeed
been warped, maybe it would slowly resume its original shape
once the dried adhesive was absent.
When I went back to listen after an hour or two, the buzzing
was almost gone. I left the radio to play all night long.
By morning, it sounded fine at all volumes. Whatever the cause,
the problem had been fixed!
With that, the restoration was complete. I reinstalled the
chassis in the cabinet, checked it one last time for correct
operation, then packed it for shipment. This photo shows the
restored set.
I always ship radios in double boxes to guard against breakage. (See How to Ship Antique Radios Safely.)
Final Thoughts
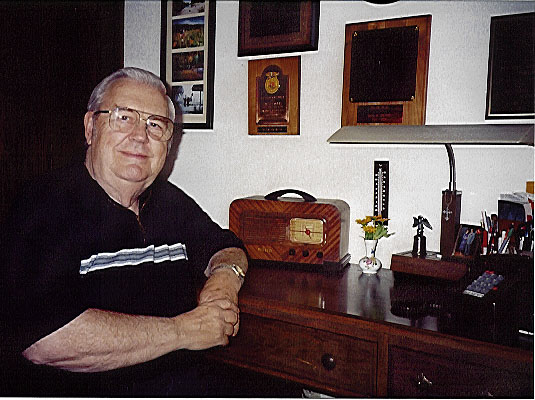
Here's a shot of my Dad in his den, with the newly restored Philco
on his desk. He enjoys using this set, and I had a great time restoring it.
He also owns Kennedy 63-A console that I intend to restore
some day. Since it's a heavy console, it will be more practical
for me to bring my tools out there, than to risk shipping it 1,000 miles.
If you're able to fix old radios, they make great gifts for family and
friends. Lots of people would enjoy having a working antique radio,
but don't have the expertise to fix one themselves. For only a few
hours of work, you can give them a radio that will provide enjoyment
for years.
|