Hallicrafters SX-88 Owners Manual
Images and text excerpted from original Hallicrafters literature.
Section 1. General Description
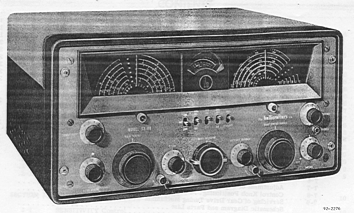
The Hallicrafters SX-88 represents the ultimate in precision communications equipment. This superb twenty tube communications receiver contains virtually every feature essential for top performance, operating ease, and dependability. It offers continuous coverage from 535 kc to 33 mc and provides for the reception of AM phone, single-sideband phone, and CW signals over its entire tuning range. Electrical bandspread, calibrated for the 160, 80, 40, 20, 15, 11, and 10 meter amateur bands, provides for fine tuning on bands 2 through 6. Band changing is accomplished from the front panel of the receiver, without the use of plug-in coils.
The receiver employs dual conversion on all six bands. As a result, images are practically nonexistent, rejection varying between 60 and 120 db depending on the band. Its 3 stage 50 kc second IF with 8 tuned circuits provides "razor sharp" selectivity ... selectivity greater than most crystal circuits because of the extreme steepness of its selectivity curve. Receiver selectivity is variable in six steps from 250 cycles to 10 kc at the "nose" and 850 cycles to 24 kc at the "skirt".
Two tuned r-f stages on all bands except the broadcast band where one stage is adequate, assures maximum sensitivity and a high signal-to-noise ratio for outstanding reception of weak signals. An antenna trimmer, adjustable from the front panel, permits peaking of the 1st r-f stage to compensate for loading effects of various antennas. Receiver sensitivity for a 10 to 1 signal-to-noise ratio measures 1 microvolt on bands 2 through 6 and 10 microvolts on band 1. A manual sensitivity control prevents overloading on strong signals.
Outstanding frequency stability is achieved by means of ceramic coil forms in the oscillator section, temperature compensation, voltage and current regulation in the 1st conversion oscillator, and the use of a crystal controlled 2nd conversion oscillator.
Tuning is accomplished by a precision anti-backlash gear-train mechanism to insure extremely close calibration and accurate resettability. The ratio of each tuning control to its associated tuning dial is 24 to 1; i.e., 24 complete revolutions are made by the control while the dial makes one complete band coverage. A logging scale on each dial, calibrated from 0 to 24, indicates the revolutions made by the control. Since the metal skirt of each control is calibrated from 0 to 100, this system of tuning makes it possible to divide each frequency band on the main and bandspread tuning dials into 2400 readable settings. A lock on each tuning dial provides positive locking action without affecting its frequency setting. Smooth flywheel tuning assures maximum traverse speed and operating ease.
A built-in 100 kc crystal calibrator provides marker signals at every 100 kc on the dial for checking the calibration accuracy. Any calibration adjustment required can be made from the front panel, by means of the adjustable dial pointers. A trimmer capacitor, accessible from the top of the chassis, permits adjustment of the calibrating crystal to exactly 100 kc by comparison with the frequencies transmitted by station WWV.
The amplified and delayed AVC circuit in the receiver functions on both AM and CW signals to keep the output level of the receiver constant regardless of input-signal variations. This type of AVC circuit is advantageous in that it provides excellent control over a wide range of signal strengths and yet maintains full receiver sensitivity on weak signals.
An automatic series noise limiter circuit, controlled by a switch on the front panel, eliminates interference from electrical equipment and other sources of pulse type noise such as ignition noise.
A tuned buffer amplifier stage isolates the beat frequency oscillator from the detector and provides for two levels of injection, low level injection for CW reception and high level injection for single-side band reception. A three-position toggle switch on the front panel permits selection of either level, and also turns the beat oscillator off for AM reception. The frequency of the beat oscillator is controlled by the Pitch control on the front panel which varies the audible beat note from zero to plus or minus 2500 cycles.
An "S" meter is used when receiving AM signals to indicate the accuracy of tuning and the relative strength of received signals. The meter is calibrated in microvolts, "S" units from I to 9, and in decibels above S-9 to +40 db.
The Receive-Standby switch on the front panel silences the receiver but leaves the power on to provide instant reception between transmission periods. Provision has also been made in the receiver for remote receive-standby control, and for transmitter control with the standby switch. An auxiliary sensitivity control, located on the top of the chassis, is switched in the circuit when the receiver is in the "standby" position to permit monitoring of your transmitter signal. A neon lamp, connected across the secondary of the antenna coil, protects the receiver against possible damage from excessive r-f voltage at the antenna terminals during transmission. Protection is provided for terminal voltages up to 50 volts.
A push-pull 6V6 audio output stage with inverse feedback delivers 10 watts of audio power. Audio output connections include terminals for 3.2 and 8 ohm speakers as well as a 500/600-ohm line or speaker output. A front panel jack for headphones is also provided, and the speaker is automatically disabled when the headphones are plugged in. The response of the audio amplifying system is essentially flat from 20 to 20,000 cycles. A 5-position full range tone control provides responses for normal, communications, and full fidelity reception.
The SX-88 operates from a 105-125 volt, 50-60 cycle AC power source. The universal model, the SX-88U, operates from 25-60 cycle AC sources at voltages ranging from 100 to 250 volts. Both models also have provisions for operation from an external power supply or batteries for emergency service in areas where AC power is not available.
This receiver is certified by the FCDA under Specification M6-1, Item #Rl2.
Section 2. Installation
2-1. Unpacking
After unpacking the receiver, examine it closely for damage which may. have occurred in transit. Should any sign of damage be apparent, file a claim immediately with the carrier stating the extent of damage. Carefully check all shipping labels and tags for instructions before removing or destroying them.
Caution: When removing the receiver from the carton be extremely careful not to place any strain on the tuning knobs. Failure to observe this precaution may result in serious damage to the precision tuning mechanism.
2-2. Location
The receiver may be placed in any location that will permit free air circulation through the ventilation holes and openings in the cabinet. Avoid excessively warm locations such as those near radiators and heating vents. The external speaker may be located in any convenient position although it is recommended that it not be placed on top of the receiver for reasons of ventilation.
If rack mounting is desired, the receiver may be removed from the cabinet by removing the two screws at each side of the front panel, the four screws at bottom of the cabinet, and then sliding the receiver out of the cabinet. The 8-3/4" x 19" front panel of the receiver has holes suitably spaced to fit the standard 19-inch radio relay rack.
2-3. Antennas
The r-f input of the receiver is designed for operation from either a single-wire antenna, or a half-wave doublet or other tuned antenna with transmission line impedances from 52 to 600 ohms. Antenna connections are made to a three terminal strips at the rear of the receiver marked "A1", "A2", and "G". Mounting holes are also provided, adjacent to the antenna terminals, for installation of an AN type SO-239 connector for coaxial cable installations.
2-3-A. Single Wire Antenna
The simplest antenna and one which will provide satisfactory results throughout the entire tuning range is a conventional single-wire antenna, 50 to 100 feet long. This type of antenna should be erected as high as possible and kept free from surrounding objects. When using a single-wire antenna, attach the antenna lead-in to terminal "A1" and connect the jumper link between terminals "A2" and "G". In some locations, reception may be improved by connecting a ground wire between terminal "G" and a cold water pipe or outside ground rod.
2-3-B. Half-Wave Doublet
For top performance, especially on the shortwave ranges, the use of a half-wave doublet or other type of antenna employing a 52 to 600-ohm transmission line is recommended. The doublet antenna should be cut to the proper length for the most used frequency or band of frequencies. The overall length in feet of a half-wave doublet is determined by the following formula:
Length in feet = 468 / frequency in megacycles
The doublet antenna may be fed with either a balanced or unbalanced transmission line. When a balanced transmission line such as "twin-lead" or a twisted pair is used, the two leads are connected to terminals "A1" and "A2", and the jumper link between terminals "A2" and "G" is disconnected. When using an unbalanced transmission line such as coaxial cable, the inner conductor connects to terminal "A1", the outer braid connects to "A2", and the jumper link connects between "A2" and "G".
The doublet antenna provides optimum efficiency only at the frequency for which it is cut. Therefore, it may be desirable for reception on frequencies remote from the antenna frequency to utilize the antenna as a single wire type. This is accomplished by connecting the two transmission line leads together and connecting them to terminal "A1". The jumper link in this case should be connected between terminals "A2" and "G".
la an installation where the receiver is used in conjunction with a transmitter, it may be advantageous to use the same antenna for receiving as for transmitting. This is especially true when a directive antenna is used since the directive effects and power gain of the transmitting antenna are the same for receiving as for transmitting. Switching of the antenna from the transmitter to the receiver may be accomplished with a double-pole, double-throw antenna changeover relay or knife switch connected in the antenna leads.
For further information regarding antennas, refer to the "Radio Amateur's Handbook" or the "A.R.R.L. Antenna Book", both published by the American Radio Relay League; West Hartford, Conn., U.S.A.
Caution: When using the SX-88 receiver in close proximity to transmitting equipment, avoid excessive r-f voltage at the antenna terminals of the receiver during transmission. Nearby antennas or even short lengths of transmission line between the receiver and antenna. relay can pick up high r-f potentials. Voltages in excess of 50 volts at the receiver antenna terminals can destroy the protective neon lamp and antenna stage coils.
2-4. Power Source
The SX-88 receiver is designed for operation on 105-125 volt, 50-60 cycle AC current while the universal model, the SX-88U, operates on 100-250 volt, 25-60 cycle AC current; The normal power consumption of each receiver is 138 watts. Each receiver is also equipped with a DC power input socket to permit operation on an external power supply or batteries for portable or emergency service in areas where AC power is not available. This socket is located at the rear of the receiver and is marked "POWER SOCKET". In addition to equipping the receiver for DC operation, the POWER SOCKET also supplies 300 volts DC at 10 ma between pins 1 and 3, and 6.3 volts AC at .6 amp between pins 1 and 6 for operating accessories.
2-4-A. AC Operation
Insert the line cord plug into any convenient AC power outlet of the proper rating. If in doubt about your power source, call your local power company before plugging in the receiver.
Caution: When operating the SX-88U, it is essential that the power selector switch (located on the rear of the power transformer) be set for the voltage at the AC outlet before plugging in the receiver. Failure to observe this precaution may result in serious damage.
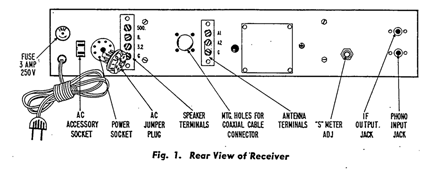
Note: The receiver will not operate from an AC source unless the AC JUMPER PLUG is inserted in the POWER SOCKET at the rear of the receiver. (See Fig. 1.)
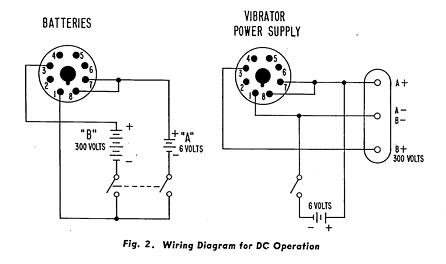
2-4-B. DC Operation
The receiver may be operated from an external DC source, such as a vibrator power supply or batteries, by removing the AC JUMPER PLUG normally located in the POWER SOCKET at the rear of the receiver, and replacing it with a similar octal plug wired as shown in Fig. 2. Note that pins 7 and 8 of the DC plug are connected together by a jumper wire so that the 4H4 current regulator tube is automatically disconnected to supply the correct heater voltage to the 6UB tube when Operating from an external 6-volt source. The voltage and current requirements for DC operation are as follows: "B" supply, 300 volts at 200 ma; "A" supply, 6 volts at 6 amps.
2-5. Speaker Connection
A four-terminal strip, marked "G-3.2-8-500", is provided at the rear of the receiver for. the speaker connections. Approximately 10 watts of audio power are available at these terminals. Any speaker having an impedance of either 3.2 or 8 ohms can be used with the receiver by simply connecting one lead from the speaker to the common ground terminal marked "G" and the other lead to the numbered terminal which corresponds to the speaker voice coil impedance. For optimum results, the use of the Hallicrafters R-46 or R-46A speaker is recommended. The R-46 speaker has a built-in matching transformer and connects to terminals "G" and "500" while the R-46A, which has no matching transformer, connects to the terminals marked "G" and "3.2". When using a speaker with an impedance other than 3.2 or 8 ohms, a matching transformer should be used to insure optimum performance. The matching transformer should have a 10-watt power rating, a 500-ohm primary impedance, and a secondary impedance to match the impedance of the speaker being used.
2-6. Headphones
The headphone jack, marked PHONES, is located on the front panel of the receiver and is wired so that the speaker is automatically disabled when the headphones are plugged in. The headphone output load impedance is not critical and any commercial type headphones may be used, including crystal types as no direct current flows in the headphone circuit. For maximum headphone output, the use of high impedance magnetic or crystal phones is recommended.
2-7. Record Player Connections
An audio input jack, marked PHONO, is provided at the rear of the receiver for attachment of a record player using either a crystal pickup, or a magnetic pickup with a suitable pre-amplifier. Connection to the PHONO jack is made with a standard single-pin phono plug. Shielded type cable should be used to prevent hum, connecting the inner conductor to the center prong of the plug, and the outer metal braid to the shell of the plug.
For phono operation, set the BAND width control on the front panel at "PHONO" and operate the VOLUME and RESPONSE controls as explained under Sections 3-7 and 3-12. 'The remaining controls are inoperative and will have no effect on phono operation.
2-8. Relay and Transmitter Switching
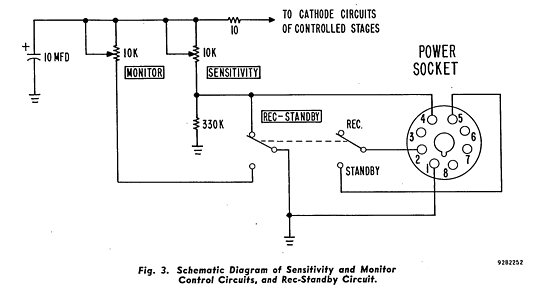
One half of the dpdt REC-STANDBY switch on the front panel connects to pins 2 and 5 of the POWER SOCKET at the rear of the receiver, and is available for transmitter switching. (See Fig. 3) This half of the switch is wired so that it is closed when the RE C-STANDBY switch is set at "STANDBY" and open when set at "REC". To reverse the switching sequence (i.e., to have the switch open when the REC-STANDBY switch is set at "STANDBY" and closed when set at "REC") disconnect the lead on the switch which connects to pin 5 of the POWER SOCKET and connect it to the unused terminal on the switch.
2-9. Remote Rec-Standby Switch
The receiver may be disabled remotely by connecting a remote spst switch between pins 1 and 4 of the AC JUMPER PLUG located in the POWER SOCKET at the rear of the receiver. (See Fig. 3). To operate the receiver from a remote location, set the REC-STANDBY switch on the front panel at "STANDBY" and use the remote switch to place the receiver in "receive" or "standby" operation.
2-10. AC Accessory Outlet
An AC outlet is provided at the rear of the receiver for operating a record player, oscilloscope, or accessories.
2-11. IF Output Jack
The IF OUTPUT jack at the rear of the receiver provides a low impedance cathode follower output at the second intermediate frequency of 50 kc for feeding a teletype converter, oscilloscope, etc. The i-f output signal is obtained from the grid of the 3rd 50 kc IF amplifier, amplified by the AVC amplifier, coupled to the cathode follower, and then fed through a DC blocking capacitor to the IF OUTPUT jack. The IF OUTPUT jack will be operative only if the AVC switch is set at "ON".
Section 3. Function of Operating Controls
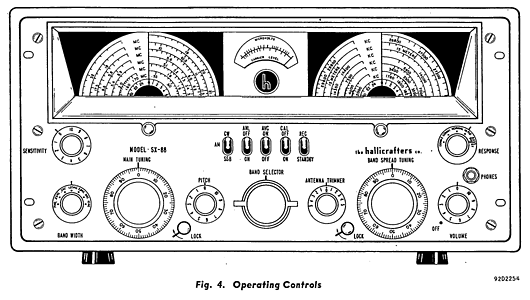
3-1. Sensitivity Control
The SENSITIVITY control varies the gain of the lst and 2nd RF amplifier stages and the lst, 2nd, and 3rd 50 kc IF amplifier stages. Maximum sensitivity is obtained with the control set at "10" (fully clockwise). In this position, the tubes, being controlled are operated at maximum gain with minimum cathode bias. As the control is rotated counterclockwise, the bias on the tubes increases with a resultant decrease in gain.
3-2. CW-AM-SSB Switch
This switch, when set at "CW" or "SSB", applies plate voltage to the beat frequency oscillator (BFO) to render it operative for the reception of CW or single-sideband signals, The beat frequency oscillator employs a Hartley oscillator circuit and is voltage regulated to insure highly stable operation. Oscillator look-in is eliminated since the output of the beat oscillator is coupled to the second detector through a tuned buffer amplifier. When the CW-AM-SSB switch is set at "SSB", the cathode bias resistor of the BFO buffer amplifier tube is decreased in value, thus providing Increased BFO output for proper reception of single-sideband signals. The "AM" position of the CW-AM-SSB switch disables the BFO for normal reception of standard broadcast and AM phone signals.
3-3. ANL Switch
This switch, when set at "ON", places the automatic series noise limiter circuit in operation to reduce pulse type noise such as ignition noise and electrical interference. The limiter circuit allows the signal to pass through the receiver unaffected, but makes the receiver inoperative for noise amplitudes greater than those of the signal. It will work equally well on AM or CW signals and is self adjusting, i.e., it automatically adjusts itself to the signal level.
The noise limiter circuit "chops" noise peaks received at the detector by means of a biased diode which becomes nonconducting above a predetermined signal level. The audio output of the detector must pass through the limiter diode to the grid of the audio amplifier when the limiter circuit is in operation. The limiter diode normally acts as a conductor for the audio signal as long as the diode plate is positive with respect its cathode. When a noise peak is higher in amplitude than the signal, it instantaneously swings the plate negative with respect to the cathode, conduction ceases, and that portion of the signal is automatically cut off from the audio amplifier. The point at which the limiter diode becomes nonconducting is made sufficiently high so that the diode will not clip modulation peaks and thus impair intelligibility appreciably, but low enough to limit the noise peaks effectively.
3-4. AVC Switch
The AVC switch, when set at "ON", places the AVC circuit in operation to maintain the output level of the receiver constant regardless of normal input-signal variations. AVC voltage is applied to the 1st and 2nd RF amplifier stages, 2nd mixer, and lst 50 kc IF stage. Since delayed AVC is employed in the receiver, the AVC circuit does not come into operation (i.e., it is delayed) until the carrier strength reaches a pre-determined level. The result is that no AVC voltage is applied to the grids of the controlled stages until the required carrier strength is reached. With this arrangement, the AVC bias on the controlled tubes is zero until the peak voltage applied to the plate of the AVC diode exceeds the delay voltage applied to its cathode. Thus, the AVC circuit offers very effective control on average and strong signals and yet maintains full receiver sensitivity on weak signals.
In the conventional AVC circuit, which uses the rectified carrier voltage developed at the detector, the use of AVC for CW reception results in a loss of sensitivity when the BFO is switched on. This occurs because the beat oscillator output acts exactly as a strong received signal, and causes the AVC circuit to put high bias on the controlled stages, thus reducing the receiver sensitivity. In the SX-88 receiver, this undesirable effect is eliminated by completely isolating the AVC circuit from the second detector by means of an AVC amplifier stage which obtains its input signal ahead of the detector stage, (and BFO), thus permitting the reception of CW signals with AVC functioning.
3-5. CAL. OFF-ON Switch
The CAL. OFF-ON switch controls the operation of the built-in crystal calibrator. When the switch is set at "ON", the crystal calibrator is turned on to provide marker signals at every 100 kc on the dial for checking the dial calibration accuracy. The crystal calibrator employs a crystal controlled pentode oscillator circuit. The output of the crystal calibrator is capacitively coupled to the antenna input circuit. A trimmer capacitor, adjustable by the CRYSTAL ADJ control on the top front of the chassis, permits adjustment of the calibrating crystal to exactly 100 kc by comparison with the frequencies transmitted by WWV. This capacitor has been set at the factory and should normally not require periodic readjustment unless extreme calibration accuracy is required. If adjustment Is required, proceed as outlined in Section 7-7.
3-6. REC-STANDBY Switch
The REC-STANDBY switch, normally set at "REC", permits disabling of the receiver during transmission periods, at the same time maintaining the heater and plate supplies operative for instant use when reception is again resumed. The receiver is disabled by setting the REC-STANDBY switch at "STANDBY".
Note: When the REC-STANDBY switch is set at "STANDBY", the receiver may still be made operative, if desired, by means of the MONITOR control on the top rear of the chassis. This permits monitoring of your own transmitter signal when the REC-STANDBY switch is being used to control the transmitter. Only when the MONITOR control is rotated fully counterclockwise (zero sensitivity position) will the receiver be completely disabled when the REC-STANDBY switch is set at "STANDBY".
One section of the REC-STANDBY switch may be used for relay or transmitter switching, if desired. For connections and details, refer to Section-2-8.
3-7. RESPONSE Control
The RESPONSE control varies the frequency characteristics of the receiver audio system. The five types of response available are BASS BOOST, HI FID, NORMAL, COMM 1, and COMM 2. For broadcast reception and phono operation, the BASS BOOST and HI FID positions are recommended white for the reception of CW and AM. phone signals, where intelligibility rather than fidelity is the primary concern, the NORMAL, COMM 1, and COMM 2 positions are usually more desirable. Fig. 5 shows the frequency characteristics obtained with the control set in each of its five positions.
A. HI FID. (High Fidelity)
This position provides an essentially flat response from 20 to 20,000 cycles, thereby providing as near true reproduction of the original signal as possible. This position is recommended for high fidelity reproduction of AM broadcast programs, tapes, and records.
B. BASS BOOST
In this position, the response at the high frequency end of the audio range remains the same as in the "HI FID" position; however, the level of the low audio frequencies is boosted approximately 10 db above that of the mid and high audio frequencies.
C. NORMAL
In this position, the response is essentially flat at the low and mid-frequencies and slightly attenuated at the high frequencies. The "NORMAL" position maybe used to improve the signal-to-noise ratio when excessive background noise or static is experienced.
D. COMM I & COMM 2
These positions are especially useful for communication work under sharp selectivity conditions (BAND width control set at ".25 KC" or '.5 KC"). The "COMM 1" and "COMM 2" provide attenuation at both the high and low frequency ends of the audio range. The response in the two positions differs only in the amount of attenuation at the high frequency end, the "COMM 2" position providing considerably greater attenuation than the "COMM 1" position.
3-8. BAND width Control
The BAND width control is used to vary the selectivity of the receiver to fit receiving conditions. Six degrees of Selectivity are available, ranging from 250 cycles, for CW reception under crowded band conditions, to 10 kilocycles for maximum fidelity for broadcast reception. The six selectivity positions are shown on the BAND width control and indicate receiver selectivity at 6 db down. A seventh position on the control, marked "PHONO", disables all of the receiver circuits except the audio system for phonograph operation.
For broadcast reception, the BAND width control is normally set at "5 KC" or "10 KC" the positions affording broad selectivity. Selectivity may be progressively increased by turning the BAND width control to the positions marked "2.5 KC" "1.25 KC", ".5 KC", and ".25 KC". For reception of the crowded amateur and shortwave bands, it is generally advisable to sacrifice fidelity for greater selectivity, since the added selectivity reduces both adjacent-channel interference and background noise by attenuating the higher audio frequencies, Too much selectivity on AM signals, however, will attenuate the high audio frequencies to such an extent that the signal may become unintelligible as a result of excessive side-bandcutting. When receiving CW signals, the sharpest selectivity position may be used without the loss of intelligibility experienced in AM reception.
3-9. PITCH Control
Fig. 6. IF Selectivity Curves
The PITCH control operates the tuning-slug in the BFO coil to vary the frequency of the beat frequency oscillator approximately 2.5 kc each side--of its center frequency of 50 kc. The primary function of the PITCH control is to vary the pitch of the audible beat note when receiving CW signals. It is also used when receiving single-side band signals to vary the frequency of the reinserted carrier in the receiver.
3-10. BAND SELECTOR Control
The BAND SELECTOR control operates the band switch to select the desired band of frequencies. The frequency range or band covered by each position of the BAND SELECTOR control is indicated directly on the control. The band in use. on the main tuning and band spread tuning dials is illuminated for ease in tuning.
The BAND SELECTOR control performs three functions on each band: (1) it places the proper set of coils and sections of the main and band spread tuning capacitors into the circuit to cover the desired frequency range. (2) it selects the bias resistor in the cathode circuit of the 2nd RF amplifier stage to provide the proper gain for each band, and (3) it switches the 2nd conversion oscillators and 1st mixer plate to operate at the required first intermediate frequency (2075 kc on bands 1, 3, 4, 5, and 6; 1550 kc on band 2).
3-11. ANTENNA TRIMMER Control
The ANTENNA TRIMMER control operates a variable capacitor connected across the secondary of the antenna coil of the band in use. This capacitor adjustment compensates for loading effects of various types of antenna installations.
3-12. VOLUME Control
The VOLUME control adjusts the audio level at the speaker terminals and phones jack and,, in addition, turns the receiver on and off. Clockwise rotation of the control turns the receiver on and increases the signal applied to the grid of the audio amplifier tube', thus increasing the receiver volume.
3-13. Main Tuning Dial
The main tuning dial has six calibrated scales and a 24-division logging scale. Each division on the logging scale represents one complete revolution of the MAIN TUNING control. Since the metal skirt of the MAIN TUNING control is calibrated from 0 to 100, this method of tuning divides each scale on the main tuning dial into 2400 readable settings. Thus, by recording the settings of the logging scale and MAIN TUNING control, the receiver may be accurately reset to any desired frequency. A tuning lock to the right of the MAIN TUNING control permits positive locking action without affecting the frequency setting of the main tuning dial. To lock the main tuning dial, simply turn the locking knob clockwise.
IMPORTANT: The calibration on the main tuning dial will be accurate only if the band spread tuning gang is set at minimum capacity. This is accomplished by rotating the BAND SPREAD TUNING control counterclockwise until the dial pointer is aligned with the index marks at the high frequency end of the dial. If the band spread tuning gang is set at any setting other than minimum capacity, the additional band spread capacity, added to the main tuning capacity, would throw off the main tuning dial. calibration because the receiver is calibrated with the band spread tuning gang set at minimum capacity.
The dial settings for the amateur bands are indicated on the main tuning dial by white dots and wavelength in meters (160, 80, 40, etc.). When tuning the amateur bands with the band spread, dial, the main tuning dial must be set and locked at the setting corresponding to the desired amateur band.
3-14. Band Spread Tuning Dial
The band spread tuning dial contains a 24-division logging scale and six scales calibrated for the 160, 80, 40, 20, 15, and 11-10 meter amateur bands. The six scales are calibrated to read receiver frequency directly when the main tuning dial has been set to the index dot of the desired amateur band. H precise calibration accuracy is desired on the amateur bands, the main tuning dial should be more accurately set the means of the built-in 100 kc crystal calibrator as outlined in Section 4-4A, "Calibration of the band Spread Dial".
Each division of the 24-division logging scale on the band spread dial represents one complete revolution of the BAND SPREAD TUNING control. Since the metal skirt of the BAND SPREAD TUNING control is calibrated from 0 to 100, this method of tuning divides each scale on the band spread dial into 2400 readable settings. Thus, by recording the settings of the logging scale and the BAND SPREAD TUNING control, the receiver may be accurately reset to any desired frequency. A tuning lock to the left of the BAND SPREAD TUNING control permits positive locking action without affecting the setting of the band spread tuning dial. To lock the band spread tuning dial, simply turn the locking knob clockwise.
In addition to its use on the amateur bands, the band spread tuning dial may also be utilized as a fine tuning adjustment over any portion of the frequency range on bands 2, 3, 4, 5, and 6. Fine tuning is accomplished as follows:
(a) Set the band spread tuning gang at minimum capacity by rotating the BAND SPREAD TUNING control counterclockwise until the dial pointer is aligned with the index marks at the high frequency end of the dial.
(b) Set the main tuning dial at the high-frequency end of the range of frequencies to be covered and then slowly tune through the range using the BAND SPREAD TUNING control.
3-15. MONITOR Control
The MONITOR control on the top rear of the chassis permits adjustment of the receiver sensitivity when monitoring your own transmitter signal. The MONITOR control is an auxiliary sensitivity control switched in the circuit only when the REC-STANDBY switch is set at "STANDBY"; it replaces the SENSITIVITY control on the front panel which is switched out of the circuit during standby operation. When monitoring your transmitter signal, the receiver antenna should be disconnected by relay or switching device so the signal will not "block" or damage the receiver. As a further precaution against overloading, the MONITOR control should not be advanced any further than necessary to hear the transmitter signal. When it is not desired to monitor the transmitter signal, the MONITOR control should be set fully counterclockwise (zero sensitivity position) so that the receiver will be completely disabled when the REC-STANDBY switch is set at "STANDBY".
SECTION 4. OPERATION
4-1. AM RECEPTION
1. Set the front panel controls to their starting positions as outlined below.
|
VOLUME |
OFF |
|
BAND SELECTOR |
At the desired band. (Band in use will be illuminated when receiver is turned on.) |
|
SENSITIVITY |
10 (maximum sensitivity) |
|
BAND width |
5 KC (2.5 KC or 10 KC if desired) |
|
CW-AM-SSB |
AM |
|
ANL OFF-ON |
OFF |
|
AVC ON-OFF |
ON |
|
CAL OFF-ON |
OFF |
|
REC-STANDBY |
REC |
|
ANTENNA TRIMMER |
0 (zero) |
|
RESPONSE |
NORMAL (or as desired) |
2. Loosen the tuning locks at the sides of the MAIN TUNING and BAND SPREAD TUNING controls by turning the LOCK knobs counterclockwise.
Important: Before making any tuning adjustments with the MAIN TUNING or BAND SPREAD TUNING controls, it Is essential that the dial pointers be properly indexed by means of the small knob located directly below each dial. This is accomplished by rotating the MAIN TUNING and BAND SPREAD TUNING controls fully clockwise and aligning the dial pointers with the index marks at the low frequency end of the dial.
3. Turn the receiver on by rotating the VOLUME control clockwise. The band in use on the main tuning and band spread tuning dials will light up indicating the receiver is operative. Adjust the VOLUME control for the desired volume level.
4. Set the band spread tuning gang at minimum capacity by rotating the BAND SPREAD TUNING control counterclockwise until the dial pointer is aligned with the index marks at the high frequency end of the dial. The band spread tuning dial may now be locked in position, if desired, to avoid disturbing its setting. The band spread tuning dial is calibrated for the 160, 80, 40, 20, 15, and 11-10 meter amateur bands. For convenience in tuning, the AM phone bands are indicated on the band spread dial by a wide line directly above their location on the dial. For fine tuning of the amateur and shortwave bands with the BAND SPREAD TUNING control, see Section 3-14. The BAND SPREAD TUNING control has no effect on standard broadcast reception (Band 1).
Important: The frequency calibration of the main tuning dial will be correct only if the band spread tuning gang is set at minimum capacity as specified above.
5. Tune in the desired signal with the MAIN TUNING control, tuning for maximum indication on the "S" meter. The dial calibrations on all bands are located above the frequency markings. After the signal has been accurately tuned in, adjust the ANTENNA TRIMMER control for maximum indication on the "S" meter, and then set the VOLUME control for the desired volume level.
Note: The "S" meter indications will be correct only when the AVC switch is set at "ON", and the SENSITIVITY control is set at 10 (maximum sensitivity setting). If the SENSITIVITY control is set at a setting other than "10", AVC action will also be somewhat restricted.
6. Set the BAND width control for the. desired degree of selectivity. For standard broadcast reception'(Band 1), the control is normally set at "10 KC" for maximum fidelity. the positions marked "5 KC", "2.5 KC", "1.25 KC", and ".25 KC" provide progressively increasing steps of selectivity. Note that as the selectivity of the receiver is increased, the background noise and interference from adjacent signals is reduced. Too much selectivity, however, will cause excessive side-band cutting. While side-band cutting reduces fidelity, it may be frequently preferable to sacrifice naturalness of reproduction in favor of communications effectiveness. When changing the position of the BAND width control from a broad to a narrower response (for example: from "2.5 KC" to "1.25 KC"), a slight readjustment of the tuning controls may be necessary to recenter the signal in the i-f pass-band.
7. Set the RESPONSE control for the desired tonal quality.
8. If it is desired to operate with AVC off, set the AVC switch at "OFF", set the VOLUME control to a well advanced position, and vary the receiver volume level by means of the SENSITIVITY control to avoid "blocking" by strong signals.
9. If severe electrical disturbances or ignition or other types of pulse-type noise interfere with reception, set the ANL switch at "ON" to place the automatic noise limiter circuit in operation.
10. The receiver may be disabled without turning it off by setting the REC-STANDBY switch at "STANDBY". In this position, the r-f and i-f stages are cut off but the heater and plate supplies remain operative for instant reception. To resume reception, simply return the switch to the "REC" position.
4-2. CW Reception
For CW reception, set the VOLUME control at a well advanced position and vary the volume level of the receiver by means of the SENSITIVITY control, taking care not to advance the control to a point where strong signals will cause excessive "thumping" (overloading). The receiver may be operated with AVC on or off, as desired. (See Section 3-4.) Operation of the receiver with AVC on is highly desirable since it not only minimizes fading but also prevents blasting when tuning from a weak to a strong signal.
CW signals are made audible by the heterodyning action of the beat oscillator with the incoming signal. The beat oscillator is set at a frequency slightly different from the second-intermediate frequency of 50 kc, the difference being equal to the pitch of the audible note desired. To adjust the beat oscillator frequency, first tune in a steady, unmodulated carrier with the beat oscillator turned off (CW-AM-SSB switch set at "AM"), the AVC switch set at "ON", and the BAND width control set at ".25 KC" (the sharpest selectivity position). If desired, the built-in crystal calibrator may be used as the signal source as it provides a suitable carrier at every multiple of 100 kc on the dial. The crystal calibrator is made operative by setting the CAL OFF-ON switch at "ON". Adjust the receiver tuning to the carrier frequency as indicated by a maximum indication on the "S" meter. (This centers the carrier in the i-f passband.) Then turn on the beat oscillator by setting CW-AM-SSB switch at "CW" and adjust its frequency by means of the PITCH control (leaving the receiver tuning unchanged) to give a pleasing beat note. The beat oscillator may be set on either the high- or low-frequency side of zero beat. (The beat oscillator operates on the high side when the PITCH control is set at a position to the right of "0", and on the low side when the PITCH control is set at a position to the left of "0".) After the PITCH control is set, turn off the crystal calibrator by setting the CAL OFF-ON switch at "OFF", tune in a CW signal, and adjust the ANTENNA TRIMMER control for maximum loudness. With the receiver in the sharpest selectivity position, CW signals will drop in and out rapidly as the receiver is tuned across a band, and a slow rate of tuning is highly desirable. Once the PITCH control has been set, it need not be reset for each CW signal.
Note: If a CW signal is tuned in with the BAND width control at a setting other than 11.25 KC", it may be necessary to slightly readjust the receiver tuning when changing to a narrower response in order to properly position the signal in the i-f pass-band.
The setting of the BAND width control for CW reception is generally best determined by receiving conditions. Note that as the selectivity of the receiver is increased (BAND width control varied in steps from the "10 KC" to the ".25 KC" position), the background noise and adjacent-channel interference is considerably reduced. For CW reception, the sharpest selectivity position may be used without loss of intelligibility experienced in AM reception.
The RESPONSE control and automatic noise limiter (ANL) circuit can be used to great advantage on CW reception, just as on AM reception, to reduce the effects of background noise and electrical interference. For CW reception, the "COMM 1" and "COMM 2" positions of the RESPONSE control can prove very effective in improving the signal-to-noise ratio by attenuating both the lower and higher audio frequencies. Maximum attenuation of these frequencies is obtained with the RESPONSE control set at "COMM 2".
4-3. Single Sideband Reception
Single-sideband signals are transmitted with little or no carrier, and it is necessary to reinsert the carrier in the receiver before proper reception is obtained. In the SK-88 receiver, this is accomplished in the 50 kc i-f system by injecting the beat oscillator signal at the input of the second-detector. A single-sideband signal can be identified by its unintelligibility, and by a severe variation in the "S" meter indication corresponding to the speech modulation.
For single-sideband reception, set the AVC switch at "ON", the CW-AM-SSB switch at "SSB", RESPONSE control at "COMM 1" or "COMM 2", and the BAND width control at either "1.25 KC" or "2.5 KC", depending upon adjacent-channel interference and noise. Set the SENSITIVITY control at a well advanced position and vary the receiver volume level by means of the VOLUME control. Initially set the PITCH control at either "0", or the Position marked "4" to the right of "0". The single-sideband signal will be intelligible at only one of these two settings, the proper setting depending upon the sideband being transmitted. If the signal is not intelligible after tuning is completed as outlined below, set the PITCH control to the other setting and repeat the tuning procedure.
Tune in the single-sideband signal for maximum loudness with as good intelligibility as possible. (This centers the signal in the i-f passband.) After the signal is properly tuned in, adjust the ANTENNA TRIMMER control for maximum loudness and then very carefully adjust the PITCH control for best intelligibility. If the PITCH control is improperly set, the speech will sound high- or low-pitched, or very distorted. Best intelligibility will be obtained with the PITCH control set very close to its initial setting, usually not more than 1/2 division on either side of the initial setting.
The "1.25 KC" position of the BAND width control permits reception of modulating frequencies up to about 1500 cycles. For reception of modulating frequencies higher than 1500 cycles, set the BAND width control to the positions marked "2.5 KC", "5 KC", or "10 KC", depending on the degree of fidelity desired; maximum fidelity is obtained in the "10 KC" position.
4-4. Use of Crystal Calibrator
The built-in 100 kc crystal calibrator permits accurate dial calibration over any portion of the main and band spread tuning dials by a comparison of the dial calibrations with the marker signals which appear at every multiple of 100 kc on the dial. Any calibration adjustment required can be made by adjustment of the dial pointer from the front of the receiver.
Important: Before making any calibration adjustment, it is essential that the main tuning and band spread tuning dial pointers be properly indexed. This is accomplished by rotating the MAIN TUNING and BAND SPREAD TUNING controls fully clockwise and aligning the dial pointers with the index marks at the low frequency end of the dial by means of the small knob located directly below each dial.
A. Calibration of the Band Spread Dial
1. Set the band spread tuning dial at a convenient multiple. of 100 kc at the high frequency end of the band in use. For example: 2000 kc on 160M, 4000 kc on 80M, 7300 kc on 40M, 14,400 kc on 20M, 21,500 kc on 15M; and 29,800 on 10M. (The band spread tuning dial is calibrated in kc.)
2. Set the main tuning dial to the index dot of the desired amateur band.
3. Set the CW-AM-SSB switch at "CW", the PITCH control at "0", and the CAL OFF-ON switch at "ON".
4. Very carefully adjust the MAIN TUNING control for exact frequency as indicated. by "zero beat" and then lock the main tuning dial in place to avoid disturbing its setting. The band spread tuning, dial is now accurately calibrated and a "zero beat" should be obtained at every multiple of 100 kc on the band in use. For example, on the 80 meter amateur band, a "zero beat" should be obtained at 3500, 3600, 3700, 3800, 3900, and 4000 kc.
5. The procedure outlined in Steps 1 through 4 above provides average calibration accuracy over the entire frequency range of the band in use. For precise calibration accuracy over a particular section of the band, the procedure is identical except that the band spread dial is set at a multiple of 100 kc near the desired frequency or range of frequencies, instead of at the high end of the band as in Step 1.
B. Calibration of the Main Tuning Dial
1. Turn the BAND SPREAD TUNING control counterclockwise until the dial pointer is aligned with the index marks at the high frequency end of the dial. Then lock the band spread dial in place to avoid disturbing its setting.
2. Set the main tuning dial at a convenient multiples of 100 kc near the desired frequency or range of frequencies. (The main tuning dial is calibrated in me.) To determine the nearest 100 kc multiple, simply remember that 100 kc is equal to one-tenth mc. For example, from 2.0 to 3.0 mc on band 2, the 100 kc multiples are 2.0 mc, 2.1 mc, 2.2 mc, 2.3 mc, etc.
3. Set the CW-AM-SSB switch at "CW", and the PITCH control to "0". Then set the CAL OFF-ON switch at "ON" and very carefully adjust the MAIN TUNING control for a "zero beat". After "zero beat" Is obtained, very carefully index the main tuning dial pointer (by means of the small knob directly below the dial) with the nearest 100 kc multiple on the dial.
4-5. Use of "S" Meter
The "S" meter provides a visual means of determining whether or not the receiver is properly tuned, as well as an indication of the relative signal strength. The "S" meter circuit consists of a DC milliammeter connected In series with the plate lead to the lst RF amplifier tube, the grid of which is controlled by AVC voltage. Since the plate current of this tube varies with the strength of the incoming signal, the meter will indicate relative signal strength. The "S" meter is calibrated in microvolts, "S" units from 1 to 9, and in decibels above S-9 to + 40 db. The indications on the "S" meter will be correct only when the SENSITIVITY control is set at "10" (maximum sensitivity) , and the AVC switch is set at "ON".
The limitations of the microvolt scale should be fully appreciated before any assumption as to the indicated signal voltages is accepted. The meter has been calibrated in microvolts of signal strength as developed at the antenna input terminals when terminated in a 52-ohm load, on bands 2 and 3. The microvolt scale will be somewhat less accurate under other load conditions and on bands 1, 4, 5, and 6.
4-6. Service or Operating Questions
For further information concerning operation or servicing of your receiver, contact your Hallicrafters dealer. The Hallicrafters Co. maintains an extensive system of Authorized Service Centers where any required service can be performed promptly and efficiently at a nominal charge. For the location of the one nearest you, consult your local dealer or telephone directory. Make no service shipments to the factory as the Hallicrafters Co. will not accept the responsibility for unauthorized shipments.
The Hallicrafters Co. reserves the privilege of making revisions in current production of equipment and assumes no obligation to incorporate these revisions in earlier models.
|